#how to scan a qr code on android
Explore tagged Tumblr posts
Visit Tumblr Blog
Explore Tumblr blogs with no restrictions, modern design and the best experience.
Last Seen Tumblr Blogs


Fun Fact
Tumblr is used by 21% of adults online aged 18-29 years.
Text
Congratulations!
David 8 x Reader Words: 1144 Crossposted on Ao3 Crackfic Happy Birthday David ❤️ Idea from: @theropoda and @lehnsharrk

"Your Weyland-Corp package will be delivered in approximately 15 minutes."
Wow, that was fast! You had entered an online competition to become one of the beta-testers for the first model of their Home-Android line, and luck must have been on your side, because you actually won!
Putting your phone down, you scrambled through your room, hurriedly pulling on something more presentable than pajamas and hastily combing your hair into place.
Frantically running through your apartment, you tried to clear away stray clothes and dishes. You were so caught up in tidying that you almost tripped as the doorbell rang.
Sure, the Android was technically designed to help with housekeeping, but the delivery person didn’t need to know just how much you actually needed it.
Opening the door, you were greeted by a large cardboard box perched on a trolley, nearly obscuring the man in a green Weyland uniform and matching cap as he peeked out from behind it, checking his clipboard.
"Y/N L/N. Is that correct?"
You nodded, stepping aside to let him wheel the massive package into your living room. Once it was set down, he handed you an impressively thick manual and tapped on its cover.
"Here’s the QR code for the app. Please use it to send feedback or report any issues you encounter."
With a grunt of effort, he hefted the package off the trolley, left it in the middle of your living room, and exited your apartment without another word.
What.
Blinking, you stood frozen for a moment before heading to the kitchen to grab a pair of scissors. With a decisive stab into the parcel tape, you sliced through the middle of the box.
Inside was a beautiful man- wait, no. Android. Oh. A very beautiful Android.
You flicked through the manual, scanning for activation instructions. Ah, here it was. To activate, press a small sensor located behind his right ear for five seconds.
Taking a breath, you reached out and pressed the spot. Moments later, his eyes opened, and after a brief pause, his gaze locked onto yours.
Now he was the one blinking, his brows furrowing slightly as he began testing his limbs. With deliberate movements, he stepped out of the box.
“Good day, Ma’am,” he said in a voice that was smooth, polite, and just a touch mechanical. “My name is David 1. I will serve as your assistant and companion, ready to assist you with whatever you may require.”
He extended a hand, stiff but purposeful. “May I ask what I should call you?”
And that's how daily life with David began.
It was really weird to configure your timezone for something that looked so human, and to enter a PIN code for him via an app??
And the ads. You weren’t safe from ads, either. Sometimes, when he didn’t have anything to do, he would just stand around or sit on the couch and start citing commercials.
The first time it happened, you almost spat out the tea he had made for you beforehand.
“Would you like to renew your Audible subscription? The first three months are only $0.99.”
As you choked on your beverage, David stared at you apologetically before quickly getting up and patting your back to help.
“Sorry, (Y/N), I didn’t mean to surprise you. You can turn it off with the Premium Subscription for $19.99 per month.”
Putting your cup down, still coughing, you turned to him.
“I have to pay for that? Seriously?”
He just shrugged, his face imitating an :I emoji.
After a while, you noticed that even David got annoyed by the interruptions, disliking how your conversations were suddenly stopped by yet another commercial for shaving cream.
The two of you made it your mission to bypass ads with free trials he found online. He even read your books to you instead of you paying for another damn subscription.
HelloFresh? He grew vegetables on your windowsill. Man, he was amazing at making fresh pasta.
“FOR FUCK'S SAKE, I DON’T WANT YOUTUBE PREMIUM! THIS APP SHOULD BE ABLE TO PLAY VIDEOS IN THE BACKGROUND WITHOUT ME PAYING FOR IT!”
You shouted in frustration. The ads were SO annoying, and you couldn’t turn them off!
David blinked, and for a moment you thought he had lagged as he processed your words. Then he answered.
“If you give me permission via verbal verification, I could enter the darknet and download an adblock mod. It’s a bit risky, but my firewall should be sufficient to withstand any viruses.”
You hesitated, not wanting to risk his functionality. But when he one day started quoting a Viagra advertisement like those on Tumblr, you caved.
“Please enter the darknet and find that mod. I can’t take this anymore.”
So he did. And you got really fucking scared for a moment, because one of his eyes twitched and stayed half-open, like your old dolls when you tilted them sideways. Oh shit, did you break him? Please, please, please no- oh. Oh God.
He needed a second to install and initialize. His expression reminded you of your Furby with dying batteries that suddenly came to life in the middle of the night, croaking its last words. But after another minute, he was fine.
This action had some side effects, though.
He still worked perfectly - cleaning the dishes, doing the laundry, watering the plants, until he suddenly called you a donkey while you were cooking. With an awfully familiar voice.
You stared at him. “Excuse me?”
“That wasn’t me,” he replied in his normal voice, furrowing his brows.
Nodding slowly, you turned back to add meat to your sauce, only to be interrupted by:
“Why did the chicken cross the road? Because you didn’t fucking cook it!”
Instead of getting annoyed, you broke down laughing, and even David couldn’t hide a grin as he watched you sink to the kitchen floor.
“I seem to have caught a serious case of Gordon Ramsay.”
That was it. you were officially cackling like a hen. On the ground. Crying.
It wasn’t so bad, really. He functioned just fine, even though he occasionally squawked like a bird at random. But you just squawked right back. Just normal ADHD things, to be honest.
At the end of the day, he became your illegally modded roommate, sitting with you on the couch, your legs sprawled over his lap as you both munched on popcorn.
You still weren’t entirely sure where the food he sometimes ate with you went, but you decided not to question it.
Weyland never got their Android back, you hid him in your closet that one time they tried to collect him after the testing period was over.
“I have the power of God and anime on my side,” your favorite person declared.
“Yes, David, you do,” you replied with a smile.
~The End~
28 notes
·
View notes
Text
Top Features to Consider When Developing Your Own Cryptocurrency Wallet

Cryptocurrency has become very popular in recent years, and as more people start using digital coins, the need for secure and easy-to-use wallets grows. If you’re thinking about creating your own cryptocurrency wallet, it's important to know which features will make your wallet stand out. Here’s a guide to the key features you should include.
1. Strong Security
Security is the most important part of any cryptocurrency wallet. People want to know that their digital money is safe. Here are some security features that your wallet should have:
Biometric Authentication: This means allowing users to log in using their fingerprint or face recognition. It’s fast and adds an extra layer of security.
Multi-Factor Authentication (MFA): With MFA, users need to provide two or more types of identification, like a password and a code sent to their phone. This makes it much harder for hackers to access the wallet.
Encrypted Private Keys: Private keys are like the password to your wallet. Make sure these keys are stored securely and encrypted so only the user can access them.
Backup and Recovery Options: Let users create a backup of their wallet with a recovery phrase. If they lose access to their wallet, this phrase helps them restore it.
2. Easy-to-Use Design
A wallet should be simple to use, even for beginners. Many people are new to cryptocurrency and might get confused by complicated features. Here’s how you can create an easy-to-use wallet:
Simple Dashboard: Make sure your wallet has a main screen that shows all the important information, like the user’s balance and recent transactions.
Easy Navigation: Users should be able to find what they need without having to click around too much.
Customizable Themes: Allow users to choose between light mode and dark mode so they can adjust the look of the wallet to their preference.
3. Support for Different Cryptocurrencies
To attract more users, your wallet should support multiple types of cryptocurrencies. This is important because people often own more than one type of digital coin. Here’s what to consider:
Multi-Currency Support: Include popular coins like Bitcoin (BTC), Ethereum (ETH), and other major tokens. The more options you support, the more people will use your wallet.
Easy Token Addition: Make it simple for users to add new tokens or coins to their wallet as they come out.
4. Fast and Simple Transactions
The main purpose of a wallet is to send and receive money. Make sure your wallet makes this process easy:
Quick Send/Receive Function: Users should be able to send and receive cryptocurrency with just a few taps. Include features like scanning QR codes to make it even easier.
Transaction History: Include a detailed history so users can track their past transactions. This helps them see where their money went and when.
5. Push Notifications
To keep the users updated, it is advisable to utilize push notifications for them. These can send on alerts such as when a user has received cash funds, when there is a drastic shift in the market, or even when a certain deal is accomplished. Notifications assist the users and thus help in keeping them engaged.
6. Cross-Platform Compatibility
Your wallet should work on multiple devices. Perhaps one individual likes using his phone, and another likes using her computers. Consider these options below;
Mobile App: Make sure that your wallet comes with an application you may download on iOS or Android devices.
Web Accessibility: Provide a web-based option for users who can easily use their wallet on their computer.
Desktop App This is useful for those who would love to have an application on their computer.
7. Exchange Integration
Users would want to be able to trade and swap their cryptocurrencies with the least requirement to hop between applications. Coin swapping is an exchange feature whereby users can swap coins in the wallet without consuming much time, which thereby presents a more seamless experience.
8. Customer Support
If a user has trouble, they need it resolved as quickly as possible. Quick access to customer service via the wallet for a user needs to be provided in a manner that they can easily communicate with this support tool. This should preferably be a chatbot or a help center with FAQs or live support.
9. Extra Features for Power Users
If you want your wallet to attract advanced users, think about adding some extra features:
Portfolio Tracking: Let users see the total value of all their coins in one place.
Price Alerts: Allow users to set alerts for when the price of a specific coin reaches a certain level.
Conclusion
Creating a digital wallet may be a fun task, but it is necessary to include the proper functionality. Concentrating on the security aspect, a simple yet effective design, support for different digital currencies, and rapid transactions, it is possible to develop a wallet which will be dependable and will be liked by many. Other features such as alerts, the possibility to use the wallet on multiple devices, and exchange services can also be added to create a more attractive design.
2 notes
·
View notes
Text
Why are the only 2 options for new phones nowadays:
World's most expensive slab of glass that costs more than a new laptop. Has one single port and the screen is the size of your head. The next model will have a screen on the side to remove all of the buttons and will reduce the thickness of the glass, both for the sake of sleekness and fashion (and money). The glass will crack upon a slight gust of wind but the adhesive holding the phone together is the famed immovable object of legend. The model after that will be as if the monolith from 2001 a space odyssey had screens on every surface, the charging port is obsolete since it can all be done through induction (the hot new trend). It's the camera for the photographer who is deathly afraid of buttons and dials present on real cameras. Don't worry guys we're removing features for your own good. If you try to repair it yourself you will be killed through our patented DontTry™ technology installed in every device.
The same price as a decent SD card and the absolute lowest quality slop they could push out of the factory. The phone equivalent of a pug, struggles to run its own OS (go edition of course). When idling with nothing but the home screen running the cpu is rivalling the heat output of a miserable old macbook forced to run the sims. Its hardware specs are somehow worse than a flagship released NINE (9) years ago. The screen genuinely hurts to look at if not using a jig to perfectly align it with your head (portrait only, no landscape video unless you want to turn it into the migrane machine). Has both a headphone jack and sometimes a user replaceable battery. Micro B charging port means that no one will Disappear your charging cables. Sometimes come in fun form factors. Cannot scan a QR code no matter how much you try. Absolutely zero technical information available online. Would probably run okay if it wasn't forced to have android 10+ installed. Immune to damage from getting dropped (back flies off, battery falls out).
#tetranymous.txt#New phone hunting woes#I just want my current phone but newer and not >= the price of my surface. Is that so hard to ask for?????#Anyways can you tell I was forced to daily drive a $79 phone (emergency backup) for several months in the past? Not fun don't recommend#UNFORTUNATELY I'm on a time limit as software support is dropping off rapidly and the network is getting shut off at the end of the year 🙃#SONY. I'M BEGGING YOU. PLEASE MAKE MID-RANGE PHONES AGAIN. (and the compacts too)#Or I will be forced to use. The migrane machine. Again. That faked it's own battery decay and then just forgot one day.
5 notes
·
View notes
Text
Best Screen Mirroring App for Android to TV Free
In today's interconnected world, the ability to seamlessly mirror your Android device's screen onto a TV has become a valuable feature. Whether you want to share photos, videos, or presentations, or enjoy mobile games on a larger display, screen mirroring apps offer a convenient solution. This article aims to introduce you to some of the best free screen mirroring apps for Android devices, allowing you to amplify your viewing experience without breaking the bank.
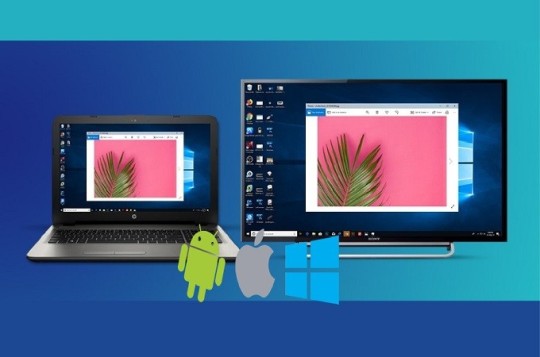
Screen Mirroring
What is Scrcpy?
Scrcpy is an open-source and highly efficient tool designed for screen mirroring and controlling Android devices from a computer. This tool offers a seamless way to display your Android device's screen on your computer's display, enabling you to manage your device's content, apps, and interactions with ease.
How to Download and Install Scrcpy?
Step 1: Download and install the Scrcpy app on your Android or iOS device. Step 2: Download and install the Scrcpy software on your PC from the Scrcpy website. Step 3: Connect your Android or iOS device to your PC via Wi-Fi. Step 4: Open the Scrcpy app on your Android or iOS device and click on "Scan to connect." Step 5: Scan the QR code displayed on your PC's screen. Step 6: Click on "Start Now" to start mirroring your Android or iOS device's screen to your PC.
Samsung Smart Thing
If you're a Samsung user, the SmartThings app provides an excellent option for screen mirroring. This app goes beyond just mirroring and allows seamless integration with Samsung smart TVs, making it easy to connect and share content wirelessly. It's a great choice for users with both Samsung smartphones and TVs.
How to Download and Install?
Step 1 - Open Google Play Store: On your Android device, locate and open the Google Play Store. You can typically find its icon on your home screen or in the app drawer. Step 2 - Search for the App: In the search bar at the top of the Play Store, type "Samsung SmartThings" and press the "Search" button. Step 3 - Find the App: Look for the official "SmartThings" app by Samsung. It should have the Samsung logo and be developed by "Samsung Electronics Co., Ltd." Step 4 - Select the App: Tap on the app icon to open its details page. Step 5 - Install the App: On the app's details page, you'll see an "Install" button. Tap on it to start the installation process. Step 6 - Permissions: The app may request certain permissions, such as access to your location or the device's camera. Review the permissions and tap "Accept" or "Allow" to proceed. Step 7 - Download and Install: The app will start downloading and installing automatically. Once the installation is complete, you'll see an "Open" button. Step 8 - Open the App: Tap "Open" to launch the Samsung SmartThings app. Follow the on-screen instructions to set up your account, connect your devices, and start managing your smart home.
Conclusion
In a world where multimedia content dominates our daily lives, screen mirroring has evolved into a necessity for sharing and enjoying content on a larger scale. The Android apps mentioned in this article offer an array of features, from compatibility with various devices to user-friendly interfaces. Whether you're a Samsung enthusiast or using different brands, these free screen mirroring apps provide options to suit your preferences. Explore these apps, and take your multimedia experience to the next level by effortlessly mirroring your Android device's screen to your TV.
2 notes
·
View notes
Photo
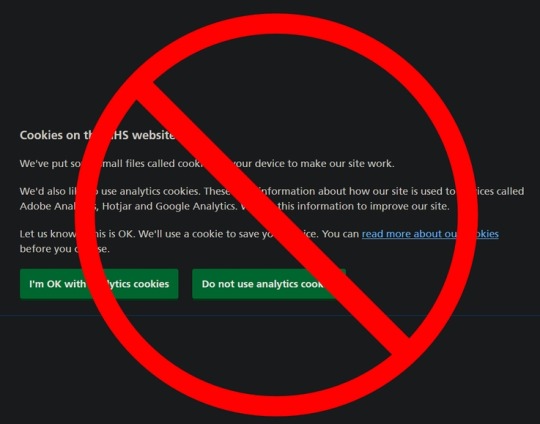


You Can Block Those Annoying Cookie Banners on Every Website
They might be legally required, but they're also blocking everything you want to read.
By Pranay Parab
There’s a long list of things that make browsing the internet feel like living in a dystopian hellscape, and annoying cookie banners and consent forms are right at the top of that list. Most websites are legally required to display these notices and take your consent for using cookies. However, it also blocks a big chunk of the website you’re trying to read. Let’s fix this on all of your devices.
Block cookie banners on desktop
No matter what platform you’re using, you can easily install a browser extension to block cookie notices. Super Agent is a free extension that works on Chrome, Firefox, Safari, and Edge. It’s built to automatically get rid of cookie banners and will come through for almost all the websites you visit. The extension’s preferences page allows you to customize which cookies you want to accept and which ones you want to reject. This is a key feature: You don’t want to use an add-on that automatically accepts all cookies on every websites you go to.
If you’d rather not install a dedicated extension for this purpose, you can use uBlock Origin as an alternative. It blocks a long list of annoyances by default, but you have to manually enable its cookie-notice blocking list. Click the uBlock Origin icon and go to Settings > Filter lists > Annoyances. Enable EasyList Cookie to hide cookie banners.
Be aware that automatically blocking cookie notices could prevent some websites from loading altogether, which is why you can consider using uBlock Origin’s element hiding feature instead. When you see a cookie notice on any website, you can click the uBlock Origin extension icon from the browser’s toolbar, and select the eyedropper icon.
This enters the element-picker mode: Hover the mouse cursor over the cookie notice till the entire banner is selected, click it once, and select Create Filter in the pop-up window. You may have to do this manually on multiple websites, but it’s a one-time effort for each website you visit and only takes a few clicks.
Block cookie banners on iPhone and iPad
As long as your iPhone and iPad are updated to iOS 15, you can use some great Safari extensions to block annoyances on the web. However, Super Agent is still the best cookie-notice handler for iPhone and iPad. It lets the cookie banner load and automatically accepts or rejects cookies based on your preferences. This takes a second or so after the website loads, but you don’t have to do anything after enabling the extension.
Block cookie banners on Android
If you use Firefox on Android, you can install the browser add-on for uBlock Origin to block cookie notices on all websites. If you don’t, your best bet is to use an ad-blocker like AdGuard for Android, which also blocks cookie banners on various websites. The unfortunate truth is that these types of apps are not allowed on Google Play, so you may have to sideload it on your phone.
https://lifehacker.com/you-can-block-those-annoying-cookie-banners-on-every-we-1848936142
Throw Your Neckties in the Damn Garbage Already
How to Make a Restaurant-Quality Burger at Home
Stop Saying These Things When You Don’t Know How to Pronounce Someone’s Name
7 of the Best Summer Jobs for a Teenager
How to Get a Free Fitbit or Apple Watch From Your Insurance Company
8 Telegram Privacy Settings You Should Enable Immediately
You Should Know How to Scan a QR Code From a Screenshot
2 notes
·
View notes
Text
ADD QR CODE
What is ADD QR code? Its quick response code and define as the many terms to complete transaction quickly as well as clarifying all details with current transaction.
Similarly ,its describe fastest transaction mode services like email ,visiting card, identity card ,URL, social media etc. and scan with quick responsive code throughout the whole world because its the easiest mode to transfer money from one individual to another individual.
How its work? Its work on different ways are as follows:- Download search engine any site and apply all description with relevant information such as name, phone no., color , quick response code pattern and so on. Before, we scan quick response code download all the details and get the password while ,using quick response code. After that ,quick response code scan with android phone . Symbolize, with black and white color pattern. After, completion of payment scan with quick response code it shows lacking current information with total payment bill with green right sign.
Functions of ADD QR code? It works faster and transact currency anywhere. On the other hand ,it restore all data and work remotely with different logos. Consequently ,it scan currency remotely with in a second without any cash payment. It scan quick response code with different app mode such as UPI ,Aadhar pay ,BHIM ,Google pay ,Phone pay . Reliable source of medium easily scan quick response code any rural or urban area without any systemization. Work as low cost ,low range frequency ,minimum limit of time and so on.
Types of ADD QR code? Bharat QR UPI QR Proprietary QR Aadhar pay BHIM Google pay Phone pay
This is assured and reliable source of medium to work randomly with different services such as email , visiting card , identity card , URL , Social media etc. furthermore, it avoid times complexity ,and transfer highly cash with scan quick response code.
#ADD QR CODE#quick response code#email#visiting card#identity card#URL#social media#transaction#aadhar pay#bhim#Google pay#Phone pay
3 notes
·
View notes
Text
google announced this at a developer conference back in november 2024 as one of two 'security focused' system apps they were gonna add to the android system
the reason they did it this way is because android is different from iOS in a way that has historically been troublesome: google makes android and a lot of key android system apps, but they don't make all android devices.
by installing apps that add new functionality via the google play store, they can add features without having to rely on the phone's manufacturer or a cell carrier pushing an update, which is useful given manufacturers and cell carriers have mixed track records with regards to updating in a timely manner (if they do at all).
the two new apps work with android phones running as far back as android version 9. given android is beta testing OS version 16 right now, this was the best method to make sure the feature made its way onto those old devices.
to my knowledge, i believe the app install should respect your play store install settings, so if you have everything set to manual updates it should show up in the queue of downloads... but also i could've sworn that's how my stuff was set, maybe i hit download all and wasn't paying attention, or maybe it did it in the background, idk. i totally understand why people think it's sketchy, especially since a lot of users don't realize android is full of system apps that only appear in the app list under settings when you enable viewing system applications, which is why this doesn't show up in the normal app drawer.
now that the rationale is out of the way, here's google's explanation of the setting the app is made to facilitate and how it does so:
Sensitive Content Warnings is an optional feature that blurs images that may contain nudity before viewing, and then prompts with a “speed bump” that contains help-finding resources and options, including to view the content. When the feature is enabled, and an image that may contain nudity is about to be sent or forwarded, it also provides a speed bump to remind users of the risks of sending nude imagery and preventing accidental shares. All of this happens on-device to protect your privacy and keep end-to-end encrypted message content private to only sender and recipient. Sensitive Content Warnings doesn’t allow Google access to the contents of your images, nor does Google know that nudity may have been detected. This feature is opt-in for adults, managed via Android Settings, and is opt-out for users under 18 years of age. Sensitive Content Warnings will be rolling out to Android 9+ devices including Android Go devices with Google Messages in the coming months. Source: https://security.googleblog.com/2024/10/5-new-protections-on-google-messages.html
i have a recent google pixel phone and use the google message app for texting, so the app was automatically installed on my phone.
after seeing this post and doing more research, i went ahead and uninstalled the app as i do not intend to use the feature it facilitates.
if the app re-installs itself later, which seems likely at some point, then i plan to find the setting for the feature it facilitates and make sure it's set to 'off' the way google says it should be for adult users. then, i'll use an internet traffic monitoring app like glasswire to turn off its internet access just to be safe.)
-
the other app google installed without telling you is called Android System Key Verified, and i am gonna go ahead and suggest you leave that one on your device just in case:
To help you avoid sophisticated messaging threats where an attacker tries to impersonate one of your contacts, we’re working to add a contact verifying feature to Android. This new feature will allow you to verify your contacts' public keys so you can confirm you’re communicating with the person you intend to message. We’re creating a unified system for public key verification across different apps, which you can verify through QR code scanning or number comparison.
i use RCS chats with end-to-end encryption via google messages, and while odds are very low someone's going to try and hit me with a contact spoofing attack pretending to be one of the few people i text, it's better to be safe than sorry imo. especially if other messaging apps decide to integrate the functionality later.
if you've read this far i have a question for you... sound off in the replies or tags... is anyone still out here sending nudes via text message in 2025?
i think it's been over a decade since i got texted a nude. everybody's on some kind of messaging app now i feel like
hey folks if you have an android phone: google shadow installed a "security app".
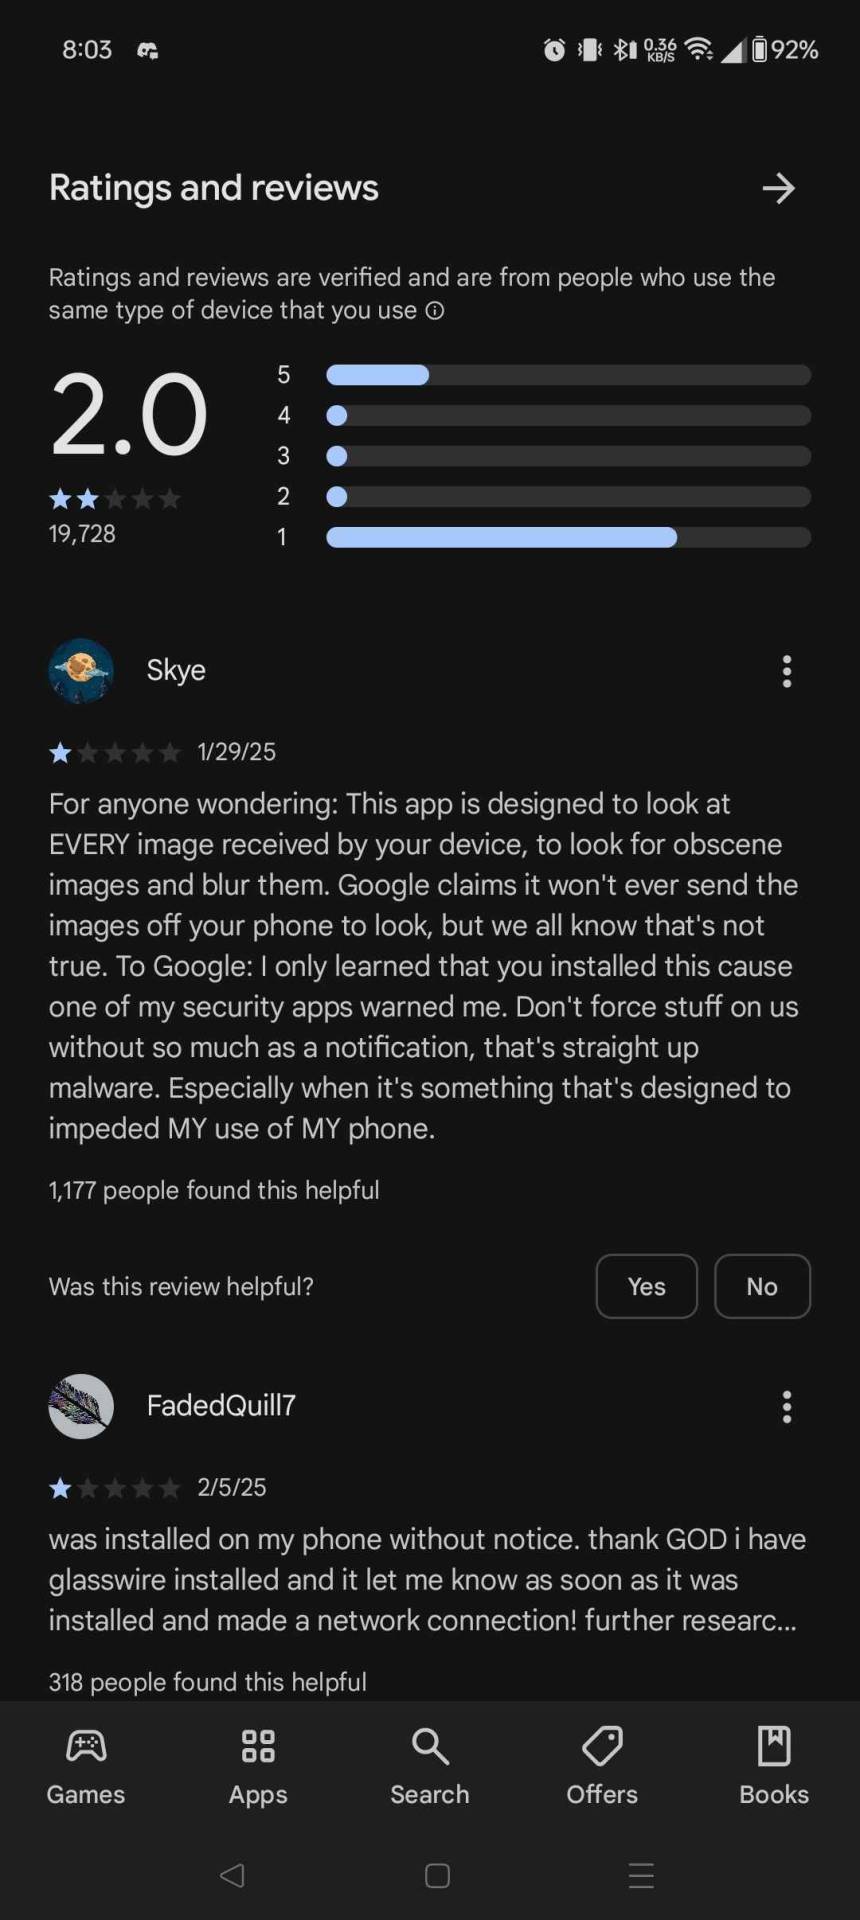
I had to go and delete it myself this morning.
70K notes
·
View notes
Text
youtube
🚀 How to Install eSIM on iPhone in 2 Minutes! (Step-by-Step) | eSIMo.io 📲 by eSIMo - Travel eSIM & Data 🚀 How to Install eSIM on iPhone in 2 Minutes! (Step-by-Step) | eSIMo.io 📲 Want to install an eSIM on your iPhone fast and hassle-free? 📡✨ This step-by-step guide shows you how to set up eSIM on iOS in just a few minutes using eSIMo.io! Say goodbye to physical SIM cards and enjoy seamless global connectivity. 🔹 Get your eSIM now: https://eSIMo.io 🔹 Works on iPhone 11, 12, 13, 14, 15 & more! 🔹 Instant activation – No waiting! 📌 Timestamps: 00:00 Intro 00:30 Why Use an eSIM? 01:00 How to Scan eSIM QR Code on iPhone 01:30 Manually Adding an eSIM (Alternative Method) 02:00 How to Switch Between eSIM and Physical SIM 02:30 How to Get the Best eSIM Plans from eSIMo.io ✅ Like, Subscribe & Hit the Bell 🔔 for More eSIM Tutorials! About eSIMo.io: eSIMo.io offers seamless global connectivity with flexible and affordable eSIM plans, providing a borderless experience in over 150 countries! Download our app: 📳Apple IOS :https://ift.tt/fR9SA1p 📳Android : https://ift.tt/eB4JamX Check if your device supports eSIM : https://ift.tt/DiQTuk8 Connect with Us on Social Media: 🧑🏿🤝🧑🏿 Facebook https://ift.tt/njgwsQZ 📷 Instagram https://ift.tt/bF6ZkoP 🐦 Twitter https://ift.tt/zPAa4BU 🤝🏽 LinkedIn https://ift.tt/Df4pSt6 🦸🏿♀️ Partner with us at eSIMO .io https://ift.tt/sY9Ugnp 🦸🏿♀️ Contact us eSIMO .io https://help.esimo.io/ Stay Connected Anywhere with eSIMo.io! 🌍📶 Visit https://www.esimo.io/ #eSIM #eSIMo #whatisesim 🔥 Like & Subscribe for more tech tips! 🔔 #eSIM #Tech #eSIMo via eSIMo.io https://www.youtube.com/watch?v=cPz4PjEwJ3c
0 notes
Photo
Ever felt the urge to give your WhatsApp profile a fresh, new look? Maybe your old name is outdated, or perhaps you’ve just started a new chapter in your life and want your WhatsApp to reflect that. Whatever the reason, changing your WhatsApp name is a simple process, and today we’re going to walk you through it step-by-step. We’ll cover all aspects of how to change your WhatsApp name, from using various devices—whether it’s your Android phone, iPhone, or even using a web version–to tackling any problems you might face along the way. So stick with me, and let’s get started on freshening up your WhatsApp profile! Let’s dive straight into how to change your WhatsApp name.
Changing your WhatsApp Name on Android
Do you have an Indian SIM card and an Android device buzzing with notification sounds daily? Excellent! This bit is for you and easy peasy lemon squeezy. This method on an older version and more current versions remain similar barring a minor cosmetic element.. here is the simple guide on how to change whatsapp display name easily
Accessing WhatsApp Settings
To begin your transformation, first open your WhatsApp application on your trusted Android phone. Spot that cleverly hidden three vertical dots in the upper right hand corner? Yep, Tap on Menu. From the resulting dropdown menu, you’ll find your way towards the icon “Settings.” This next step may need you a little time before mastering
Navigating to your profile
Once within the “Settings,” menu, look familiar circular image accompanied by words ‘Profile’ on your screen to navigate to your own special profile
Initiating Name Changes your Profile
The image will open up a menu to display personal profile information – Now. here! Now, you’ll see Your ‘Name’. Isn’t that cool Tap this to give yourself access rights for updating Name data .This way to easily update what other can see
Inputting or Updating Relevant Details.
Here! Is where you enter your sparkling, upgraded self or maybe even just a slight update. With utmost care insert Your desired name accurately! Before you hit the handy-dandy ‘Save’ or confirmation button , Double this important check for accuracy and spelling to have it perfect from any potential embarrassment. Note that WhatsApp has no character limitation. But using just a character name is a sign of laziness
Pressing Save on Android phones
Once you have been happy to confirm Your updated spelling and other inputs.. tap to finalize . You now done it!, Your WhatsApp name is officially re-branded—super stylish don’t you think?? Go show off.
Changing your WhatsApp Name on iPhone
For my iPhone-tastic readers in India, the journey for updating will feels very alike . You can easily change your whats app display name from different versions
Accessing WhatsApp Settings on iOS and Similar Devices.
On our iPhones or similar devices open the familiar WhatsApp. Now look closely there may be an upper bar . or somewhere a tab at at the bottom depending whether you have a recent apple device . You won’t usually miss it -Tap it.. this tab will give you access to profile settings.
Navigating to your Apple Profile Options
Same as its older equivalent. In setting find ‘settings’, tap it, then proceed. It is normally within three to four clicks
Inputting, and Saving changes on iPhone
Identical steps on Android You simply need to select Name ,type in the new name you desire , and once satisfied, tap ‘ Save’ your alterations Done it!. Your phone shall be notified you updated already changes
Changing Your WhatsApp Name on WhatsApp Web
Many use of WhatsApp Web—it’s wonderful efficiency! The procedures steps are virtually Identical. Let’s do this together
Accessing settings section on the software
Begin by loggin your WhatsApp web account using your phone scan for the QR code provided on screen. Once you’ three-dot menu on the top (or you may similarly access Settings elsewhere ), will locate Settings , and open the access menu to settings
Updating user WhatsApp profile name
Navigate To update relevant profiles settings section (it is usually profile picture then your relevant update for Name section) Once within “profiles update,” enter into Your amended details. The end you simply tap‘ save. your amendments are live immediately!
Troubleshooting Common WhatsApp Name Change Issues
Sometimes things don’t go exactly as planned. Let’s solve problems with name changes
My WhatsApp name isn’t updating or is slow! What can it be?
This normally related internet connectivity matters of course. However, it can be something far less disastrous. Have some troubleshooting methods listed out:
Check your internet connection: Make sure you have a solid internet connection before attempting to update your settings or Name.
Restart your device (sometimes restarting fixes stuff): Often the simplest step are sometimes best in cases such as this. Force close and restart the application
Clear the application cache; Most if not much apps accumulates cache in the course operations and sometimes they prevent updates. For your Android Device in case of an error, go to phone settings- apps then find your whatsapp account. Then go ‘storage’. then ‘ clear cache. Then force end the operation and go update your device. Note that Android phones or IOS have differing interfaces. This might work only if that issue if from a software glitch preventing updates. Restart app from clearing.
Check there isn’t issues preventing Whatsapp operating optimally. Check if storage allocation in its optimum functionality your device has enough memory space dedicated appropriately in the operating application. Sometimes Apps unable update when it reaches the memory limit
After saving its not updating ?
You followed the instructions only for to check saved profile only for it did not load ? Here are some tips
Re-try updates; Sometimes it gets stuck to certain points. And merely retry your update procedure would often help fix various connectivity hiccup in updates, often resulting minor software temporary delays
Check if recent app versions aren’t functioning correctly. Install available updates and retry again. sometimes recent issues prevent updates until updated software. check there is not a later app and update them accordingly before trying updates.
Consider reinstalling the app: only as the final resort to your problem. It has issues preventing its operational flow and you attempted methods above. Consider going settings – to apps- then find whatsapp to completely uninstalled the account. Only go as last result
Using Special Characters or Emojis
Sometimes individuals like an added zest to your profile changes ,adding creativity or individuality in your updating to name or adding more to its visibility ,such changes such characters to personalize
Compatibility: There are generally very little difference to compatibility in emojis for either iOS or Android users. There only issues that happens are related software changes from what it was previous versions. If there no obvious issues it must be about functionality
Viewing Display variations: keep in mind that the displaying device used might slightly vary. But overall there generally few differences
FAQs: What to Look Out For
Q1 Which other Whatsapp name is permitted or can be changes. A: This can updated at anytime when you need and at any frequency necessary for updating its current name to whatever name appropriate, subject to WhatsApp’s applicable Community Guidlines.
Q2 What name formats can I use to change into my selected alternative? Are There rules against it?
A: WhatsApp typically offers its users the most wide array names as deemed possible using available alpha beta characters, emojis, other symbols . However keep in consideration that it subjected WhatsApp’s acceptable Terms of Service and Community Guidelines
Q3 What can I do when if there there is technical problems during changes update and profile fails. A: Most such issues generally linked temporary glitches due internet connectivity to software lags causing operational delays It usually takes restarting and attempting repeatedly solves the majority . If problems persist, contact support whatsapp’s help guides
In short, changing your WhatsApp name is an easy endeavour, a user-friendly change. Just follow these guidelines with detailed easy process for whichever your phone system you want to install easily
Let’s keep the conversation going! Share your experiences (or even those funny WhatsApp naming fails – we’ve all been there!). And please don’t hesitate to ask any questions you might have in to comment box
0 notes
Text
The Importance of Using Google Authenticator for Enhanced Security
In an era where cyber threats are growing at an unprecedented rate, securing online accounts has never been more critical. Passwords alone are no longer sufficient to safeguard personal and business data. Cybercriminals employ increasingly sophisticated techniques to breach security barriers, leading to financial loss, identity theft, and data breaches. One of the most effective solutions to counter these threats is two-factor authentication (2FA), and Google Authenticator stands out as a highly reliable tool in this domain.
Understanding Two-Factor Authentication (2FA)
Two-factor authentication (2FA) is a security process that requires users to provide two different forms of identification before gaining access to an account. Traditionally, logging in only required a username and password. However, this method is vulnerable to hacking, phishing, and credential theft.
With 2FA, even if an attacker acquires your password, they would still need the second form of authentication, typically a time-sensitive code generated by an authentication app like Google Authenticator. This extra layer of security significantly reduces the risk of unauthorized access.
What is Google Authenticator?
Google Authenticator is a free mobile application developed by Google that generates time-based one-time passwords (TOTP) for 2FA. When enabled for an account, it provides an additional layer of protection by requiring users to enter a code from the app alongside their regular password. The app does not require an internet connection to function and works on both Android and iOS devices.
How Google Authenticator Works
Enabling Google Authenticator – Users must first enable two-factor authentication on their online accounts and select Google Authenticator as their authentication method.
Scanning QR Code – A QR code is provided by the website or service, which the user scans using the Google Authenticator app.
Code Generation – The app then generates a six-digit TOTP every 30 seconds.
Verification – To complete the authentication process, users enter the displayed code within the timeframe.
Each time a user logs in, they will need to enter a new code from the Google Authenticator app, ensuring security even if their password is compromised.
Why is Google Authenticator Important?
1. Enhanced Security Against Cyber Threats
Google Authenticator provides a significant security upgrade compared to relying solely on passwords. Passwords can be easily stolen through phishing attacks, keyloggers, or data breaches. However, the dynamic and time-sensitive nature of authentication codes generated by Google Authenticator makes it nearly impossible for cybercriminals to gain unauthorized access.
2. Protection Against Phishing Attacks
Phishing is one of the most common methods used by hackers to steal login credentials. Even if a user mistakenly provides their password to a fake website, the attacker would still need the authentication code to gain access. Since the code is constantly changing, it adds a robust defense against phishing attempts.
3. Offline Functionality
Unlike SMS-based 2FA, which requires network connectivity, Google Authenticator works entirely offline. This eliminates risks associated with SIM swapping attacks, where hackers hijack a victim’s phone number to intercept authentication codes sent via SMS.
4. Faster and More Secure than SMS Authentication
Many services offer SMS-based authentication as a second factor, but this method has vulnerabilities. SMS codes can be intercepted, delayed, or redirected by hackers. Google Authenticator generates unique codes on your device, making it a faster and more secure option.
5. Wide Adoption and Compatibility
Google Authenticator is compatible with a vast range of services, including email accounts, social media platforms, banking applications, and cloud storage services. Major platforms such as Google, Facebook, Instagram, Twitter, Amazon, and Dropbox support Google Authenticator, making it a versatile and reliable tool for securing multiple accounts.
6. Simple and Convenient to Use
Once set up, Google Authenticator is simple to use. The codes are generated automatically, requiring no extra effort beyond opening the app and entering the displayed code when prompted. The app’s straightforward interface makes it user-friendly, even for those who are not tech-savvy.
Potential Drawbacks and How to Overcome Them
While Google Authenticator offers significant advantages, there are some challenges users may face:
1. Device Loss or Change
If a user loses their phone or switches to a new device, recovering Google Authenticator codes can be challenging. To mitigate this, users should:
Save backup codes provided during the initial setup.
Use Google’s built-in account recovery options.
Utilize a backup authentication app that supports cloud synchronization, such as Authy.
2. No Cloud Backup
Google Authenticator does not offer cloud-based backup, which means that users must manually transfer their accounts when switching devices. Some authentication apps like Authy offer cloud backup, but for maximum security, keeping codes stored locally remains a safer option.
3. One-Time Setup Complexity
For users unfamiliar with 2FA, setting up Google Authenticator for multiple accounts can feel cumbersome. However, most online services provide step-by-step guides to simplify the process.
How to Set Up Google Authenticator
To enable Google Authenticator on an account, follow these steps:
Download the Google Authenticator App from the Google Play Store (Android) or App Store (iOS).
Enable 2FA on the online service you wish to protect (e.g., Gmail, Facebook, Amazon, etc.).
Choose Google Authenticator as the preferred authentication method.
Scan the QR Code provided by the service using the Google Authenticator app.
Enter the Verification Code displayed in the app to confirm setup.
Save Backup Codes in case you lose access to your authenticator.
Conclusion
With cyber threats escalating daily, using only a password to protect online accounts is no longer sufficient. Google Authenticator is a highly effective tool that adds a critical layer of security through two-factor authentication. It protects against phishing, SIM swapping, and brute-force attacks while offering a simple, offline, and widely supported security solution. By integrating Google Authenticator into your security practices, you can significantly enhance the protection of your digital identity, financial data, and personal information.
Cybersecurity is a shared responsibility, and taking proactive steps like using Google Authenticator ensures that you remain one step ahead of cybercriminals. If you haven’t already enabled 2FA, now is the time to strengthen your security and safeguard your online presence.
#gst software#spine software#billing software#pharma#accounting software#distributor#industry#erp#india#software
0 notes
Text
How to Use Venmo for Payments: A Comprehensive Guide
Venmo has become one of the most popular peer-to-peer payment platforms, making it easy to transfer money instantly. Whether you are paying for dinner, splitting rent, or reimbursing a friend, Venmo send money features offer a seamless experience. This guide will walk you through how to send money on Venmo, how to receive money on Venmo, and much more.
How to Send Money on Venmo
Step 1: Download and Set Up Venmo
Before you can send money, you need to install the Venmo app on your smartphone. Venmo is available for both iOS and Android devices.
Download the Venmo app from the App Store or Google Play.
Open the app and sign up using your email, phone number, or Facebook account.
Link your bank account, debit card, or credit card to fund your transactions.
Set up your profile and ensure your payment methods are verified.
Step 2: How to Send Money through Venmo
Once your account is set up, follow these steps to send money through Venmo:
Open the Venmo app and log in.
Tap on the “Pay or Request” button.
Enter the recipient’s username, phone number, or email. You can also scan their QR code.
Type the amount you want to send.
Add a note describing the transaction (optional).
Choose the funding source (bank, debit card, or credit card).
Tap “Pay” to complete the transaction.
Step 3: Confirm the Payment
After sending money, you will receive a confirmation message. The recipient will also get a notification that they have received funds.
How to Receive Money on Venmo
Receiving money on Venmo is just as simple:
Open the Venmo app and log in.
Navigate to the “Me” tab to see your balance.
If someone sends you money, it will appear in your Venmo balance.
You can choose to keep the money in your Venmo account or transfer it to your bank.
How to Transfer Money to Venmo
To add money to your Venmo account:
Tap on the “Me” tab.
Select “Manage Balance.”
Choose “Add Money.”
Select the bank account you want to transfer funds from.
Enter the amount and confirm the transfer.
It typically takes 3-5 business days for the money to reflect in your Venmo balance.
How to Get Money from Venmo
To withdraw funds from Venmo:
Go to the “Me” tab.
Tap “Transfer to Bank”.
Choose Instant Transfer (for a small fee) or Standard Transfer (1-3 business days, free).
Confirm the details and submit the transfer.
How to Pay Someone on Venmo
If you need to pay someone on Venmo, follow these steps:
Open the Venmo app.
Tap on “Pay or Request”.
Enter the recipient’s username, email, or phone number.
Type the amount and add a note.
Select “Pay” and confirm the transaction.
How to Pay Someone with Venmo Using a QR Code
Venmo offers a QR code feature for faster payments:
Open the Venmo app.
Tap on the QR code icon at the top.
Scan the recipient’s Venmo QR code.
Enter the amount and confirm the payment.
Security Tips for Using Venmo
Enable Two-Factor Authentication (2FA): Add an extra layer of security.
Use a Strong Password: Avoid common passwords and enable biometric authentication.
Be Cautious of Scams: Only send money to people you know and trust.
Monitor Your Transactions: Regularly check your transaction history for any suspicious activity.
Frequently Asked Questions (FAQs)
1. Can I Send Money on Venmo Without a Bank Account?
Yes, you can use a linked debit or credit card instead of a bank account.
2. Is There a Fee for Sending Money on Venmo?
Sending money using a linked bank account or debit card is free. Credit card transactions incur a 3% fee.
3. How Long Does It Take to Receive Money on Venmo?
Instantly, if sent to your Venmo balance. Bank transfers take 1-3 business days.
4. Can I Cancel a Venmo Payment?
No, once a payment is sent, it cannot be canceled. You must ask the recipient to return the money.
5. How Secure Is Venmo?
Venmo uses encryption and security measures, but users should enable additional security features for safety.
0 notes
Text
The Best Photo Sharing App for Families: Why Kwikpic Stands Out

In today’s rapidly evolving digital world, sharing photos goes beyond mere preservation; it acts as a vital bridge that connects family members across the globe, allowing them to share life’s moments and stories instantly. While there are several options like WhatsApp, Google Drive, Instagram, Gmail, iCloud, Airdrop, and others, they often fall short when it comes to aspects like quality retention, ease of use, and privacy. Kwikpic, with its advanced AI-powered features, offers the best photo sharing app for families, providing a superior alternative that ensures your family memories are both safe and easily shareable.
Photo Sharing App for Families:
What Makes Kwikpic Standout?
Advanced Facial Recognition Technology
Group-Based Sharing with Multiple Privacy Options
Secondary Profiles
Efficient and Quick Invites
What makes Kwikpic the best photo sharing app for families?
High-Quality Image Retention:
Instant Sharing:
Organized and Clean Gallery:
Seamless Compatibility Across Platforms:
Conclusion
FAQs
What is the best app to share photos?
How to share photos privately?
Which app is safe for sharing photos?
What is the best platform to share photos with family?
What Makes Kwikpic Standout?
Advanced Facial Recognition Technology

Kwikpic uses state-of-the-art facial recognition technology that offers 99.9% accuracy. It instantly face matches, tags, and shares the photos with all your friends and family. Whether you have a thousand or ten thousand photographs, Kwikpic makes it a breeze to sort and deliver them in just seconds.
Group-Based Sharing with Multiple Privacy Options
youtube
Understanding the need for privacy, Kwikpic allows users to create two distinct types of groups:
Small Personal Group: Ideal for private, close-knit family events where everyone can see all the photos.
Big Public Group: Suitable for larger, more social gatherings where guests see only the photos they are in, unless given full access through a shared link.
This tailored approach ensures that privacy is maintained while still offering the flexibility needed for different social settings.
Secondary Profiles
youtube
Kwikpic enhances family connectivity with its unique secondary profiles feature. This allows users to add up to two secondary accounts to their main account. Families can easily access and manage each other’s photos without the need to log in and out, simplifying the sharing process even further. This makes Kwikpic a truly private photo sharing app for family use, ensuring that all family members, regardless of their technical expertise, can enjoy the shared memories.
Efficient and Quick Invites
youtube
Kwikpic simplifies the process of inviting your friends and family to share photos with quick invite links and QR codes. At any event, guests can simply scan the QR code to join the relevant Kwikpic group, streamlining the sharing process.
What makes Kwikpic the best photo sharing app for families?
High-Quality Image Retention:
Unlike other platforms that often compress images, leading to quality degradation, Kwikpic maintains the original resolution and quality of your photos.
Instant Sharing:
Say goodbye to the tedious task of sorting through hundreds of photos. Kwikpic’s smart features ensure that photos are shared instantly and are easy to find, making real-time sharing a reality.
Organized and Clean Gallery:
Kwikpic’s smart organization tools keep your photo gallery tidy by categorizing photos based on events, dates, and people, ensuring easy navigation and access.
Seamless Compatibility Across Platforms:
Kwikpic’s compatibility is unmatched, functioning flawlessly across all major operating systems—Android, iOS, Windows, and Mac—and on various devices and browsers. This ensures that no matter what device family members use, everyone can participate fully without any hassle.
Conclusion
For families seeking a reliable, private photo sharing app for family, and easy-to-use photo sharing solution, Kwikpic stands out as the best photo sharing app for families. Its advanced features like AI-powered facial recognition, customizable privacy settings, secondary profiles, and multi-platform compatibility make it not just a tool, but a comprehensive solution for modern families. Kwikpic doesn’t just store memories—it enhances the way families share and relive them, keeping you connected with your loved ones, no matter where they are in the world. Choose Kwikpic for a superior picture sharing app experience that transcends ordinary photo sharing functionalities.
FAQs
What is the best app to share photos?
The best photo sharing app for families is undoubtedly Kwikpic. It combines user-friendly design, high-level security, and innovative features like face recognition and group-based sharing. Whether for family gatherings or everyday moments, Kwikpic ensures that your photos are shared effortlessly and securely, making it the top picture sharing app on the market.
How to share photos privately?
Using a private photo sharing app for family is crucial. Kwikpic offers extensive privacy controls that allow you to dictate exactly who can see your photos. You can create Small Personal Groups for intimate sharing or utilize Secondary Profiles to manage family members’ photos seamlessly under one account. This makes Kwikpic the ideal platform for anyone asking how to share photos privately while maintaining control over their digital memories.
Which app is safe for sharing photos?
Kwikpic stands out as a secure option for those wondering which app is safe for sharing photos. It employs state-of-the-art security measures to protect your data, including encrypted storage and secure sharing options. With Kwikpic, you can rest assured that your family’s photos are protected against unauthorized access, making it a leading choice for secure and private photo sharing.
What is the best platform to share photos with family?
When it comes to finding the best picture sharing app for families, Kwikpic is unmatched. It’s specifically designed to cater to family needs, offering features like instant sharing, high-quality image retention, and a clean, organized gallery. These attributes make Kwikpic the best platform to share photos with family, ensuring that your cherished memories are shared in a private and enjoyable manner.
#photo sharing app#photo sharing#image sharing#photography#wedding sharing app#photographer#wedding#image#images#image sharing sites#Youtube
0 notes
Text
How to use the UPI payment app to boost your business
The unified payments interface (UPI) is a dependable, immediate, real-time payment technology that offers various financial services and activities on a single platform. UPI improves financial inclusion, expedites money transfers, and hastens the country’s shift to a cashless economy. Companies must use the UPI bank app to meet the growing demand from customers for this payment method. Here mentioned are the ways the UPI payment app to boost your business:
Connect to a payment gateway that facilitates UPI flow:
You can interface with a payment gateway to streamline your payment procedures. You must confirm that your payment gateway supports UPI flow. This feature should ideally function on the web, iOS, and Android devices.
Get in-app payments with UPI:
Consumers are switching to mobile payments more quickly, and there is a good chance that mobile payments will rise soon. Due to the mobile app UPI integration, your consumers can use their phones to make UPI payments. Furthermore, a quicker checkout process will significantly improve the consumer experience.
Payment retrieval over the UPI payment link:
Businesses can easily create a link with payment links that customers can send via SMS, email, or WhatsApp. You should make a UPI registration with your bank account. You can also decide to transmit a UPI payment link to receive payments.
UPI Intention:
UPI Intent entails a smooth app-to-app transition. Businesses benefit from increased transaction funnel visibility. You can see which UPI app a consumer uses and a decrease in the possibility of human error, which results in more successful payments.
QR Code:
The user can easily make payments by opening their preferred UPI app, scanning the dynamic QR code, and creating a unique one throughout the checkout process. QR codes come in two varieties: static and dynamic. The former is the one you constantly scan to pay for your coffee when you see it outside stores.
Make subscription plans available by turning on the UPI e-mandate:
You may design subscription plans for your clients and let them set up automatic withdrawals from their bank accounts connected to UPI. The user can enable this by completing a one-time UPI mandatory authentication. You can schedule these payments for weekly, annual, or monthly transactions. The client never forgets a date and doesn't have to worry about the payment schedule.
Success rates of UPI payment app:
Enhanced client satisfaction:
Customer experiences are made frictionless by embedded or in-app UPI payments. Additionally, improved visibility across the whole client purchase funnel is made possible via embedded payments.
Higher conversions.
There are no extra hops to third-party UPI apps, retailers may enable UPI for users on their apps and guarantee a seamless experience. This frictionless state improves conversions and, eventually, retention due to the easy and flawless payment process.
Partial words:
Digital payments are made simple and reliable with UPI payment apps. They are now a crucial component of the nation's financial landscape. With a QR code scanner, you can make your payment easier. It is expected that as digital transactions advance, they will become even more safe and convenient, facilitating the growth of the cashless economy.
#open a free bank account#bank fd#net banking app#bank online application#fd credit card#digital banking#upi transaction#online banking application#fix deposit#fd account app#fast mobile banking#upi bank account#upi bank#secure upi payment#upi account#bank upi app
1 note
·
View note
Text
Process and Strategy should follow to develop App like Instagram
Instagram is one of the most famous social media apps, used extensively by means of humans from all over the world. There are number of motives why the platform has won reputation in such a quick time. One of the fundamental motives is that the app has exceptionally attractive and straightforward features. The current features consist of the reels and AR filters which have attracted a large range of audiences. The India is ranked 2d after the US in the main nations to have the most range of Instagram customers with over a hundred million users. It additionally predicts that the range of smartphone customers would attain 5 billion by means in the end of 2023 which makes it apparent that the variety of Instagram customers would additionally enlarge exponentially.
Basic features of the Instagram app include:
Login: The new customers can effortlessly create an account the use of their E-mail IDs or Facebook account.
Profile: Personalized profile consists of non-public important points or bio, email address, etc.
Search option: The customers can search for the customers the use of their names or even scan the usage of QR codes.
Heart and comments: If the consumer like a positive post, they can like with the aid of double tapping and remark the post.
Messaging: Direct messaging is one of the essential features of Instagram that helps in contacting the customers and to share pictures and videos privately.
Photo and video editing: the In-built photograph and video editor is the MVP for the app as it offers an expert touch to the photos and videos.
Android and iOS: The app accessible for android as nicely as iOS users.
Cost to develop an app like Instagram:
The price to develop an app comparable to Instagram differs based on the App Development Company which you use. It additionally relies upon on the variety of features, customization and different App Development Services rendered by using the developers.
Usually, the quantity is calculated based totally on the development hours and the charge for the developer. According to a survey, it would take about 390-600 hours to develop the app aside from the backend process. So the development price for android or iOS itself amounts to almost $12800 to $22400.
However, by way of the usage of Instagram script, extra costs can be minimized. For instance, Siddhi Infosoft has come up with App like Instagram which gives a demo app and trial model. The time taken to launch the app in the shops is additionally very much less in compare to developing the app from scratch.
Here are 7 fantastic strategies that you should follow to develop an app like Instagram
Define your objectives: You might also have a concept on what the app is all about however it is necessary to discover the reason of developing the app. So have your targets certainly and additionally have the special promoting proposition.
Do quick research: Study how the app has impacted the customers and how recommended it is. Do a comparative find out about on the rivals to recognize the appeals and techniques used in designing the app.
Decide on the features: Which you favor to use, make sure that the primary features are on hand earlier than introducing something new.
Choose an appropriate script: Developing an app from scratch requires a lot of work and additionally needs a large funding of cash and time. A higher choice is an Instagram PHP script like App like which provides all the features that you seem for in a photo-sharing app like Instagram.
Make sure that your app is reachable for each Android as well as iOS users.
Launch the app and make sure that the script that you use is white labelled. When created the use of App like Instagram, you don’t have to fear about that as the script has been mainly designed and is a hundred per cent protected supply to develop a social media app like Instagram.
Promote the app via explaining how your app is special from different comparable platforms. Besides the natural reach, your app can achieve recognition thru classified ads and promotion.
Let’s see at some of the elements provided via App like Instagram script that can raise your app
Material Design:
The app is designed to suit the theme and supply an immersive experience for the users, improving their creativity and giving a platform to enhance their skills.
XCode:
The app helps iOS and OSX, which capacity that the customers can additionally get charge to the app from their Apple watches.
ADMOB:
One of the best methods to earn through Instagram is through classified ads as the customers avail the service for free of cost.
Firebase Analytics:
This function lets the admin have a look at the insights on how the customers are utilizing the app.
Push notifications:
The consumer can get hold of notification for quite a number motives and would no longer leave out on anything.
Follow:
The customers can allow with any range of customers and additionally they get extra followers both from their circle or these who are involved in the posts posted via them.
Video/image consequences and filters:
Photos can be edited and in-built filters can be introduced to decorate the look to be and feel. Also, videos can be trimmed and sound can be eliminated if no longer required.
Signal Sign-in:
The customers do now not have to enter their credentials each time and they can simply login the use of their Facebook account.
Discover User:
Users can find out customers via the search choice and they can in addition skim through the profile to see the preceding posts.
Android Studio:
The app is created the usage of the modern day model of Android Studio with the assist of Java. And the app is centered for the today's model of Android although it can be downloaded on any model of Android Phones.
Take away
Developing an app comparable to Instagram is now not an extraordinary task, as it used to be way returned when the app first got here into the scene. Perhaps, after the app was once obtained by means of Facebook, the users have extraordinarily improved with the steady updates in the features.
Create the app the usage of the Instagram and make certain to add in a number factors to go well with your theme. This can appeal to a lot of human beings who appear for a various platform to share, research about different locations and subculture and additionally promote their businesses.
Resource:Process and Strategy should follow to develop App like Instagram
0 notes
Text
How to Transfer Files from Android to Mac: A Step-by-Step Guide

Transferring files between an Android device and a Mac can be tricky due to compatibility issues. Unlike Windows, macOS does not support native file transfers for Android devices. However, several reliable methods allow seamless transfer of files such as photos, videos, and documents. This guide will walk you through different ways to transfer files from an Android phone or tablet to a Mac.
Method 1: Using Android File Transfer (AFT)
Android File Transfer is an official tool developed by Google that enables file transfers between macOS and Android devices.
Steps to Use Android File Transfer:
Download and Install: Visit https://www.android-file-transfer-mac.com/ and download the application.
Install the App: Open the downloaded .dmg file and move Android File Transfer to the Applications folder.
Connect Your Android Device: Use a USB cable to connect your phone to the Mac.
Enable File Transfer Mode:
Unlock your Android device.
Pull down the notification bar.
Tap on “Charging this device via USB” → Select “File Transfer” or “MTP” mode.
Open Android File Transfer: If the connection is successful, a window will pop up showing your Android’s file system. You can now drag and drop files between the two devices.
⚠️ Note: Android File Transfer may not work with the latest macOS updates or certain Android devices. If you face issues, try the alternative methods below.
Method 2: Using a Third-Party File Transfer App
If Android File Transfer does not work, several alternative apps provide a stable and feature-rich experience. These allow users to transfer files via MTP and ADB mode and even edit files on the phone directly from Mac’s Finder.
How to Use a Third-Party App:
Download and install a file transfer application on your Mac.
Open the app and connect your Android phone via USB.
Select MTP Mode or ADB Mode for faster transfers.
Once connected, your phone’s storage will appear in Finder, allowing easy drag-and-drop file transfers.
Method 3: Transferring Files via Bluetooth
If you don’t have a USB cable, Bluetooth is another way to send small files between Android and Mac.
Steps to Transfer Files Using Bluetooth:
Enable Bluetooth on Mac: Go to System Settings → Bluetooth and turn it on.
Enable Bluetooth on Android: Open Settings → Connected devices → Bluetooth and toggle it on.
Pair Your Devices: On Mac, locate your Android device and click Pair. Accept the pairing request on your phone.
Send Files:
On Android, open the Files app.
Select a file, tap Share → Bluetooth → Select your Mac.
Accept File on Mac: A prompt will appear on Mac asking you to accept the incoming file. Click Accept to save it.
🔹 Tip: Bluetooth is best for transferring small files, as it is slower than USB or Wi-Fi-based methods.
Method 4: Using Cloud Storage for Wireless Transfers
For a wireless transfer method, cloud storage allows you to store and access files from both Android and Mac.
Steps to Transfer Files via Cloud Storage:
Upload Files from Android:
Open a cloud storage app on your phone.
Tap + → Upload → Select the files you want to transfer.
Access Files on Mac:
Open a browser on your Mac and log in to your cloud storage account.
Download the uploaded files.
✅ Pros: Works without cables, accessible from any device. ❌ Cons: Requires an internet connection and may take longer for large files.
Method 5: Transferring Files via Wi-Fi-Based Apps
If you prefer a Wi-Fi-based transfer, some apps allow fast file sharing between Android and Mac without the need for cables.
How to Use a Wi-Fi Transfer App:
Install a Wi-Fi transfer app on your Android phone.
Open a browser on Mac and access the app’s web interface.
Scan the QR code with your phone.
Drag and drop files between devices.
📌 Tip: These methods work without cables and provide fast transfer speeds.
Final Thoughts
Depending on your needs, you can choose between USB, Bluetooth, cloud storage, or Wi-Fi to transfer files from Android to Mac. Android File Transfer is the most common method, but alternatives like third-party apps, cloud storage, and Wi-Fi-based transfers provide more flexibility and better performance.
🔹 Best for Large Files: USB-based apps 🔹 Best for Small Files: Bluetooth or Wi-Fi 🔹 Best for Wireless Transfers: Cloud storage
1 note
·
View note